


Remote Access
Access your remote desktop from any device, anywhere.
 Simon Brown • Mar 14, 2024
iPhones have advanced cameras, high-quality lenses, sensors, and image processing that capture vibrant images. They are innovative features to capture moments on the go and encourage spontaneous photography, but people prefer to transfer them to other devices for advanced editing. Mac is known for supporting powerful editing software and organizing photos more efficiently.
Therefore, iPhone users search for how to transfer photos from their iPhone to Mac to edit photos and free up their phone’s space. In this regard, they should read this guide, which addresses their query about how to pass photos from iPhone to Mac through wired or wireless methods.
If you wish to create a backup of iPhone images to add a layer of security to your precious moments, this section will guide you. Here, you will learn how to transfer photos from iPhone to MacBook through wireless methods, which are suitable when you don’t have an official cable to connect both devices.
One of the most efficient and powerful ways to wirelessly transfer photos from iPhone to Mac Computer is using Avica Remote Desktop. It’s a cross-compatible software available on Android, Mac, Windows, and iPhone to facilitate data transfer regardless of operating system. Using this wireless method, you not only move pictures, but you can also control other devices remotely.
Moreover, Avica features a patented high-speed file transfer protocol and comprehensive end-to-end AES-256 encryption for transfer security. Apart from security and speed, it allows you to transfer unlimited media without any size restrictions. This software also provides complete control over remote screens where you can adjust their resolution, colors, display, and aspect ratio.
Returning to the main point of discussion, the following are the steps based on how to copy photos from iPhone to Mac using the Avica remote desktop application.
Feel free to download Avica software by clicking the button below or download the Avica mobile app from App Store and Google Play. If you're seeking additional information about Avica product downloads, you can visit the Avica download page. Rest assured, Avica guarantees the safety and virus-free nature of all products obtained from the official website or app store.
Get the latest version of Avica on your iPhone and macOS. Launch it in both systems and access its main interface to proceed. From the Avica on Mac, toggle the “Allow Remote Access to This Device via Your Credentials” and find “Avica ID” and “Password.” Note the displayed credentials and move towards Avica on your iPhone.

Enter the “Avica ID” below the “Remote Connection” section on the iPhone. After that, hit the “File Transfer” button, provide your Avica temporary password for Mac, and access the File Transfer screen.

From the next screen, continue with the “Send File” feature and choose the “Photos” option. Now, browse your gallery and select images to transfer to macOS. Upon selecting, use the “Add” button to load all the pictures and transfer them to MacBook.

Finally, choose the destination on your MacBook from your iPhone to transfer the images and press the "Send" button. Wait a second until your files are transferred to your chosen location on your MacBook.

It's a handy option that comes built-in in Apple devices to share iPhone photos with other nearby Apple devices. For this purpose, turning on Bluetooth, Wi-Fi, and AirDrop from the control center of both iPhone and MacBook is essential. Later, the below steps on how to import photos from iPhone to Mac will guide you stepwise.
Step 1: Open the Photos App and select the images you wish to transfer to Mac. Then, tap the “Share” icon and locate the “AirDrop” icon to proceed. From the next screen, choose your MacBook to proceed with the AirDrop process.

Step 2: Head to your Mac and hit the “Accept” button from the AirDrop screen. After hitting the "Accept" button, you will get two options to save the images, so choose one as you desire. Switch back to your iPhone and press the “Done” option from the top-right corner after the pictures have been transferred.

Another easy method to transfer photos from an iPhone to a Mac computer is iCloud Photos, as the iCloud web app is accessible on all operating systems via web browsers. To know how this method works, you can follow the given guide, but before starting, ensure your photos are synced to iCloud.
Step 1: Access iCloud.com on your Mac’s web browser and sign in using the iCloud credentials of your iPhone. Then, click the “Photos” widget and get a preview of all the images in your iPhone’s Photos app on Mac.

Step 2: Now, select the images you intend to transfer on Mac and navigate to the top-right side. From there, tap the "Download" icon and wait until your pictures appear in the “Downloads” folder.

Using your email to send and receive images is a common and popular method that facilitates wireless communication on media projects. All you need is an email account and a trusted receiver's email address, which can be your own second email account, or you can use the same account on both devices. Let's take Gmail as an example and guide you on how to import pics from iPhone to Mac:
Step 1: Launch the Photos app and choose images to share from your Photos album. Then, press the “Share” icon and get into the iPhone's sharing options. From there, select the “Gmail” app to load the pictures in the Gmail app. There, enter your secondary or same account email ID and press the “Send” button after adding all the other information required.

Step 2: Move to Gmail on your Mac device and sign in using your email credentials. After opening your Gmail inbox, open the mail received there with images and press the “Download all attachments” icon.

Do you have unlimited images to share from iPhone to Mac, which can’t be done through the earlier wireless methods except Avica? You can use wired methods, which don't limit you to transferring certain file sizes and numbers, but you need Apple-certified cables to connect your iPhone to macOS. Afterward, you can pick any method given on how to transfer pics from iPhone to iMac or MacBook.
macOS has a built-in software called Image Capture that allows users to transfer their images and video clips from iPhone to MacBook. The following steps will guide you on how Image Capture works and address how to move photos from iPhone to MacBook queries.
Step 1: Connect the iPhone with your Mac and run Image Capture on your Mac. Next, choose your iPhone from the left side of the interface below the “Device” section.
Step 2: Image Capture will load all your iPhone's pictures and video clips. Choose the photos you want to transfer and specify the location using the “Import To” option. Finally, hit “Download All,” and the iPhone images will be transferred to the Mac shortly.

If you have macOS Yosemite or later, you can transfer iPhone images using Mac’s Photos app after connecting your iPhone to your MacBook. This wired method can be achieved successfully with the help of the following steps on how to import iPhone photos to MacBook:
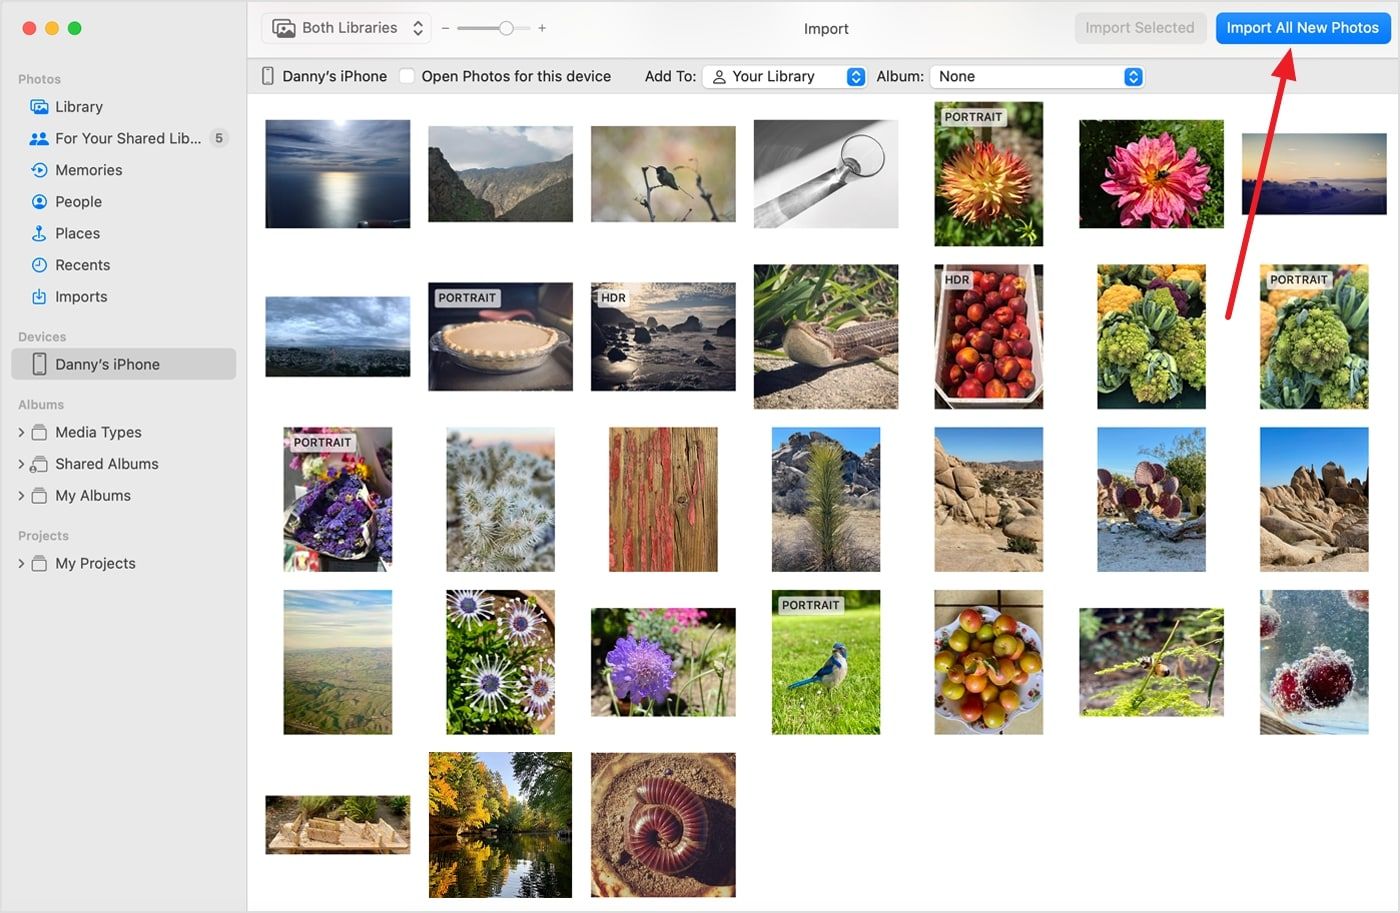
Step 1: First, connect the iPhone and macOS with an Apple-certified cable and then launch the Photos app on Mac. As you launch the Photos app, the Import screen will automatically appear.
Step 2: Choose the pictures you want to transfer manually and click “Import Selected.” If you want to move all the new images from the iPhone to the Mac, press the "Import All New Photos" button from the top right corner.
When practically trying any of the above methods to transfer photos from iPhone to Mac computer, go through the given FAQs if you face any problems or have any queries.
Theoretically, you can transfer all your images from iPhone to Mac without any limit. However, practically, it's not as simple as it seems, and you are more likely to face some issues in bulk transfer. If one of your devices doesn’t remain awake, the AirDrop process can fail.
You can also face this problem if your Mac has less storage to receive all the pictures. That is why we suggest you transfer pictures in chunks and ensure that you have enough storage available on your Mac device.
If the Photos app on your Mac isn't detecting your iPhone, ensure that your iPhone is connected with an Apple-certified cable and that the iPhone is unlocked. Besides, verify that you approved the "Trust This Computer" pop-up while connecting with your iPhone. You can restart both devices, see if any software updates are required, and adjust import settings from the Photos app to fix this problem.
The image transfer process between iPhone and macOS entirely depends on the number of photos, size, and transfer method. In a wired transfer process, it takes 10 minutes if you have photos of different sizes. On the contrary, AirDrop is slower than the wired method and takes half an hour, especially when transferring various photos of large size.
Ultimately, transferring iPhone images to macOS serves as a backup, frees up storage, and facilitates project collaboration. Therefore, this guide has presented all the potential methods based on how to transfer pics from iPhone to Mac through wired or wireless methods. Despite the method, we have provided in-depth answers to your queries so you can seamlessly transfer images regardless of the purpose.
Overall, Avica remote desktop software is the easiest, safest, and most reliable method of transferring images from iPhone to MacBook. In this regard, your devices are not required to be in nearby locations or turn on Bluetooth and Wi-Fi so you can transfer data remotely from distant locations.

Connect Everything, Work Anywhere


