


Remote Access
Access your remote desktop from any device, anywhere.
 Simon Brown • Mar 11, 2024
An external hard drive offers more storage than a computer’s internal storage and proves handy for backing up files, images, and essential data in the long term. Apple's iCloud has free space of up to 5GB that saves media for backup, and when you capture high-resolution images, it gets easily occupied.
It leads to no backup for newer memories and creates a rise to move the photos from the iPhone to the external hard drive. For this purpose, several methods facilitate transferring images from iPhones to external hard drives using computers or without computers. If you want to make this transferring process easier, read this guide and learn how to transfer iPhone photos to an external hard drive.
The straightforward answer is yes, you can transfer photos from your iPhone to the external hard drive, and for this purpose, connect your iPhone to the computer. Upon connecting, many built-in ways in Windows and macOS support image transfer, such as file explorer, photos app, and image capture.
Apart from such built-in options, you can access iCloud Photos on your macOS or Windows, but for this operation, your images must be saved in your iPhone’s iCloud backup. Moreover, a third-party application is available to transfer images without connecting the computer to an iPhone. If you don’t have a computer, there is a direct method that requires an iPhone and a Type-C OTG or lightning-to-USB adapter.
As mentioned, there are several ways to transfer iPhone images to external hard drives; this section will demonstrate all the possible methods in stepwise guides. Without further delay, read this part and familiarize yourself with how to import iPhone photos to the external hard drive.
One of the most powerful methods to export iPhone photos to external hard drives and other devices is using Avica Remote Desktop software. It’s a remote desktop application that allows users to access and control other devices with diverse operating systems from far-off locations. Using it, iPhone users can now transfer images, videos, and files effortlessly without any file size limitation.
Moreover, Avica is an end-to-end AES-256 comprehensive encryption system ensuring secure and private remote access. Besides, this app has an intuitive interface that is easy to navigate to its functionalities for all users, including iPhone, Android, macOS, and Windows. Apart from that, Avica features a patented protocol to facilitate high-speed transfer where you can set the screen resolution and responsiveness.
This software has countless other features you need to discover to gain a deeper understanding of this exclusive iPhone photos-transferring software. For this, you can go through the points briefly explained below and know what additional features it has besides file transfer.
Using Avica, you can also customize the screen preview and adjust the screen resolution, display, colors, and aspect ratios. Anyhow, let’s focus back on how to export iPhone photos to an external hard drive using Avica remote desktop to streamline productivity.
You can easily download Avica software by clicking the button provided below or download the Avica mobile app from App Store and Google Play. For more detailed information regarding Avica App downloads, please visit the official Avica download page. It is important to note that Avica ensures the safety and virus-free nature of all products available on its official website or app store. Feel confident in downloading Avica from these trusted sources.
Install the latest version of Avica on your iPhone and computer and connect the external hard drive to your system simultaneously. Sign in on both devices and access Avica's user-friendly interface. From your computer’s Avica, toggle the “Allow Remote Access to this Device Via Your Credentials” and copy the displayed “Avica ID” and “Password.”

Switch to your iPhone’s Avica and enter the “Avica ID” below the “Remote Connection” section. Then, tap the “File Transfer” button and provide the temporary password to your remote Windows PC.

Use the “Send File” button and get a pop-up from the bottom to proceed with the “Photos” option. Later, choose images to transfer and press "Add" from the top-right corner.

Finally, choose a location on your external hard drive and press the “Send” button. This way, your iPhone’s photos will be transferred to your chosen location in the external hard drive.

Another method to keep a backup of images on an external hard drive is iCloud Photos. It is accessible on all operating systems because you need to launch its web version and sign in with iCloud credentials. To discover this convenient method, review the given below steps on how to import photos from an iPhone to an external hard drive using iCloud Photos:
Step 1: Head to the iCloud website through your Windows PC or macOS and sign in using your iCloud ID and password. Click the “Photos” app from its home screen and access all the images in your iPhone’s Photo app.

Step 2: Select the required images and tap the “Download” icon located on the top right side. Once all the photos get downloaded to your system, connect your device to an external hard drive and copy-paste them there.

File Explorer, previously called Windows Explorer, is a built-in app in Microsoft Windows that allows users to manage computer files and folders. It offers a user-friendly method to transfer pictures from an iPhone to an external hard drive, which you can learn through the given steps:
Instructions: Use a lightning-to USB or USB-C to connect your iPhone to a computer’s USB port. Now, open the “File Explorer” app on Windows, access the "DCIM" folder from your Apple iPhone storage, and select your photos for transfer. Copy and paste them into the external hard drive after connecting it to your Windows PC.

Microsoft Photos is another built-in application in Windows that lets you manage images and videos and arrange them in a way that works best for you. This app also facilitates image transferring processes, and if you are curious about how to transfer pics from an iPhone to an external hard drive, the steps are below.
Step 1: Connect your iPhone to your PC and run the Photos app on your Windows. Then, tap the “Import” button and proceed with the “Apple iPhone” option from the top right side. Next, wait for the image loading process and select all the photos to import. Again, go to the top right and hit the “Add X Items” button to choose the import location.

Step 2: From the Import Items pop-up, use the "Create Folder" button and create a new folder after tapping "Create." Later, press the "Import" button, and your selected photos will be transferred to the folder you created on your Windows PC. Afterward, connect the external hard drive and copy-paste the entire folder there.

Mac operating system also has a built-in option to import iPhone photos to the external hard drive and various other devices. For this purpose, arrange an Apple-certified cable and USB-C to connect the iPhone and hard drive to the Mac, and then take guidance from the below part.
Step 1: As you establish your Mac’s connection with the iPhone and the external hard drive, run the “Image Capture” app. Move to the left side and select your iPhone below the “Devices” section.
Step 2: Choose the destination on your Mac to save your photos by accessing the “Import To” option. Next, tap "Download All" from the bottom-right side, and your images will be transferred to your chosen location on the external hard drive.

To manage and edit your digital media, macOS has a built-in application such as the Photos app that arranges groups of images based on date and location. If you find the earlier method complex to transfer iPhone pics to an external hard drive, you can try this method by following the steps ahead.
Step 1: First, connect your iPhone to your Mac and open the Photos app to see the Import Screen automatically appear. If you want to move specific pictures, select them and click the "Import Selected" button from the top-right corner.
Step 2: To move all the new photos from your iPhone, tap the “Import All New Photos” button, and the iPhone’s images will be moved to the Mac. Now, connect the external hard drive with macOS and copy-paste those images into the hard drive.

Not everyone has access to computers, or some circumstances might occur when you have to transfer iPhone pictures to an external hard drive urgently. For such situations, here is a direct method you can use, but only when you have a Type-C OTG or lightning-to-USB adapter.
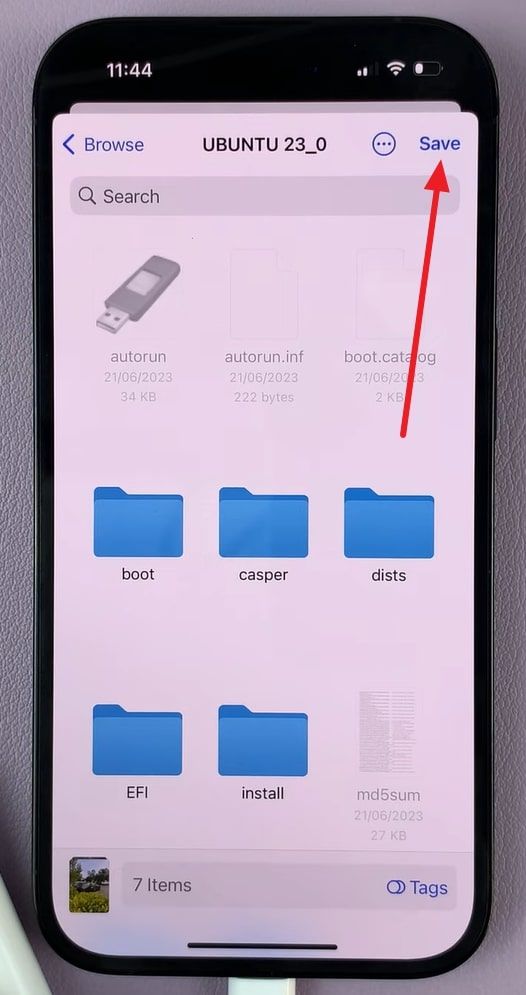
Instructions: Attach your external hard drive with your iPhone using the Type-C OTG or lightning to USB adapter and open the Photos app. Afterward, choose the photos you want to transfer to the external hard drive and tap the “Share” icon from the screen's bottom left corner. Select the “Save to Files” feature, tap on your external hard drive from the Browse screen, and press the “Save” option.
You have learned all the possible methods to import iPhone pictures to the external hard drive. If you have some queries or want to get more insights, then consult these FAQs:
Connecting an iPhone with an external hard drive directly is possible, but you need an adapter that can convert your iPhone’s port to the hard drive’s type of port. In this regard, you can use Type-C OTG or lightning to USB adapter. However, if you are using an iPhone 15, then you can directly use your type-C external hard drive.
Typically, iPhone photos and videos are saved within the Photos app that manages and organizes the iPhone's media by default. However, if users enable iCloud Photos, they can access photos uploaded to Apple's iCloud storage anywhere by signing in with Apple ID.
To wrap up, an external hard drive facilitates backup of larger images that are hard to keep on other devices. This guide has demonstrated all the potential ways to import photos from an iPhone to an external hard drive with a computer or without a computer. Here, you have learned to transfer iPhone Photos via Avica, File Explorer, iCloud Photos, Image Capture, and the Photos App.
From the above solutions, the Avica remote desktop is the most secure, user-friendly, and fastest way to move iPhone photos to external hard drives. So, start using this software if you want to transfer files effortlessly and want remote access and control to other devices.

Connect Everything, Work Anywhere


