


Remote Access
Access your remote desktop from any device, anywhere.
 Simon Brown • Apr 19, 2024
In digital music, the emergence of streaming services has impacted the need for physical media libraries and personal albums. However, they rely on an active internet connection, which can’t be available everywhere and requires a monthly subscription fee. It gives rise to creating music libraries and playlists on smartphones so you can streamline offline listening anywhere.
If you have downloaded music files to your computer and are exploring how to put music in your iPhone from your computer, this guide is for you. Thus, begin your explorative journey and find stepwise guides to copy music from a PC to an iPhone with iTunes and without iTunes.
When you transfer music from a PC to an iPhone, you can utilize the track in your social media stories and videos. It facilitates audio for instant video editing on smartphones, which is impossible if you use streaming services for music. Let's uncover some less complicated methods that don't require iTunes installation to move music across devices.
The first method to copy music from a computer to an iPhone is the Avica Remote Desktop, a wireless file transfer mode. It is an incredible remote desktop platform that allows you to share music securely across devices with its comprehensive AES-256 encryption. Users can quickly transfer unlimited music files of any size and format through Avica, which features a patented protocol for high-speed transfer.
Furthermore, this file transfer method is available on Android, iOS, Windows, and MacOS, eliminating compatibility issues. Thus, you can use this secure, easy, and faster than HTTP/FTP software to share music files between computers and mobile devices.
Avica allows you to control the remote devices that revolutionized remote workplaces’ communication and collaboration. If we focus on music file transferring, below is a step-by-step guide on how to transfer songs from a computer to an iPhone within seconds.
Feel free to download Avica software by clicking the button below or download Avica mobile app from Google Play and App Store. If you're seeking additional information about Avica product downloads, you can visit the Avica download page. Rest assured, Avica guarantees the safety and virus-free nature of all products obtained from the official website or app store.
Launch the latest version of Avica on your PC and toggle the “Allow Remote Access to This Device via Your Credentials” option. Then, copy the credentials that appear after allowing remote access and head towards the Avica on your iPhone.

Navigate to the “Remote Connection” section on your iPhone’s Avica and add the “Avica ID” obtained from the PC’s Avica. Then, hit the “File Transfer” button and provide the required password to establish a remote connection.

After hitting the “File Transfer,” choose the “Download Files” option from the next screen. Explore the music files on your PC remotely and press the “Download” button after selecting specific files. As the files are transferred, open one and tap the “Save to Files” option to move them to your Files app.

With countless collaboration tools, cloud storage spaces are well-known in the remote work sector that facilitate adequate file storage and management. Let’s consider Dropbox as an example and learn how to copy music from a PC to an iPhone through its syncing abilities.
Step 1: Sign in to the Dropbox on your PC and ensure you have selected the “All Files” option from the left side panel. Then, click the “Upload” button and get an extended list to pick the “File” option. Browse and hit the “Open” button to upload an MP3 file on Dropbox for synchronization.

Step 2: Set up the same Dropbox account on your iPhone and locate the earlier uploaded music file. There, use the “Three Dots” icon and preview an extended list to choose the “Save to Device” option. Later, tap the “Save to Files” option, and the music file will be transferred to your iPhone’s File App.

Using email, especially Gmail, is a traditional file transfer mode that almost everyone knows about. However, it limits you from attaching up to 25MB files in one email, which proves inconvenient for most users. Anyhow, consult the steps below on how to transfer music from a computer to an iPhone:
Step 1: Open your Gmail account, log in to your PC, and click the "Compose" button to compose an email. There, add the recipient's email ID and other required data to navigate towards the "Attach Files" icon. Using it, upload music files from your PC and press the "Send" button.

Step 2: Switch to the same Gmail account signed in to your iPhone and open the email sent from the PC. Then, tap the music file and touch the “Share” icon at the top-right to find an extended list from the bottom. Finally, press the “Save to Files” option and get the music in the Files app of your iPhone.

In day-to-day communication, instant messaging apps such as WhatsApp have been used to share media with our contacts. Notably, it also supports music file transfer, and to illustrate how to copy music to an iPhone from a PC, a detailed guide is below:
Step 1: Access your WhatsApp account on the PC, either installing WhatsApp on the PC or using a browser. Then, open the chat with yourself and press the “+ (Attach)” icon from the bottom. From the following list, tap the “Documents” option and browse a music file to hit the “Open” button.

Step 2: Once the music file is added to WhatsApp, verify that you have chosen the right one. Finally, click the "Send" icon, and the music file will be sent to your WhatsApp contact.

Step 3: Move to your iPhone’s WhatsApp account, open the file, and choose the “Share” icon at the bottom left. Lastly, use the “Save to Files” option, and the music file will be transferred to your iPhone.

After discovering wireless modes of music transfer, let’s shed light on how to transfer songs from iTunes on a computer to an iPhone. Although it's a typical method and is no longer widely used for the transfer process, it is a dedicated app to managing music files. If you are interested in exploring its operations, you can delve into the stepwise guide next:
Step 1: Establish a wired connection between your iPhone and PC while installing iTunes on your PC. Next, tap your iPhone’s icon, which appears on the top-left side after successfully connecting both devices.
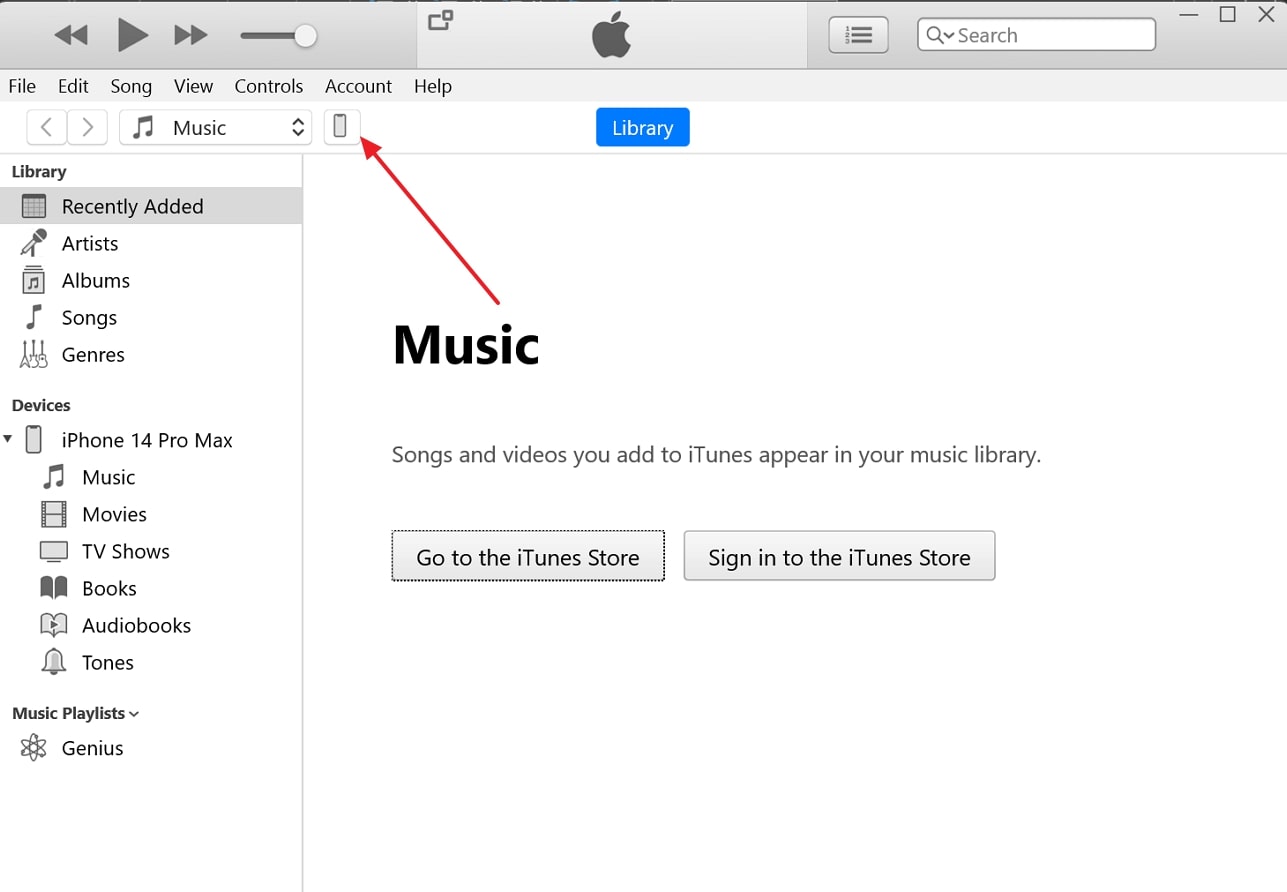
Step 2: Following this, tap on the “File” tab from the top right corner and choose the “Add Files to Library” option. Here, choose all the music files from your computer and load them into the iTunes library.

Step 3: Choose the “Music” option from the “Settings” section and tap the “Sync Music” option from the main panel. Later, enable the "Entire Music Library" or the "Selected Playlists, Artists, Albums, and Genres" option and hit the “Apply/Sync” button.

This article has reflected enough on the possible modes of copying music from PC to iPhone, either through wireless means or via iTunes. If you are confused and have trouble picking a perfect method, look at the comparative table below.
|
Methods |
Security |
Speed |
File Size |
Ease of Use |
|
Avica Remote Desktop |
Secure (End-to-end Encrypted) |
100 Times Faster than HTTP/FTP |
Unlimited |
Intuitive Interface and Easy-to-Navigate |
|
Chats (WhatsApp) |
Secure (End-to-End Encrypted) |
Takes Time to Send Large Music Files |
2GB |
Moderate |
|
Cloud Storage Services (Dropbox) |
Moderately Secure |
Depends on File Size and Internet Connection |
Limited Free Storage |
Moderate |
|
Email (Gmail) |
Unsecure (Rely on Online Servers) |
Depends on Internet Connection |
25MB |
Moderate |
|
iTunes |
Secure |
Takes Time for Larger Files |
No Limited |
Complex |
In conclusion, multiple wireless ways are available to facilitate music file transfer, and this guide has explained them all. Also, you have discovered how to copy music from a computer to an iPhone through iTunes and a tabular comparison to infer a perfect method.
If you are still confused about choosing the best method, try the Avica remote desktop application. The reason is quite visible in the comparative table: Avica's top-tier security, ease of use, speed, unlimited file transfer, and other fruitful features.

Connect Everything, Work Anywhere


